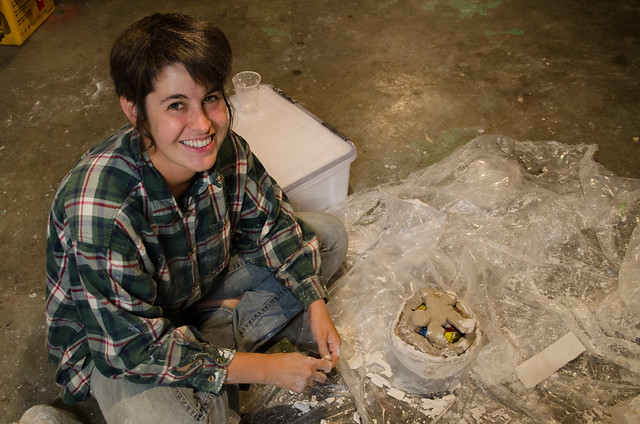
Archive for 2014

Converted GoPro Videos Don't Work in iMovie on Yosemite

,

Update June 25, 2015: iMovie 10.0.9 has been released which fixes the problem I describe below.

Recently, I’ve been enjoying using my GoPro camera with iMovie to put together silly little videos. I recently upgraded my MacBook to OS X 10.10 Yosemite, and at the same time accepted the automatic upgrade of iMovie to version 10.0.0.6. After doing so, I realized that all my previously-imported GoPro videos wouldn’t play in iMovie anymore, showing as “empty” tracks instead. I also couldn’t import converted video into iMovie anymore.

iMovie not playing GoPro Videos

To back up a bit, I’ll explain how I usually work with GoPro videos. I shoot video with my GoPro using the “ProTune” mode, and then import those videos onto my Mac. From there, I convert them into an editing-friendly CFHD (CineForm HD) format using GoPro Studio. GoPro Studio understands ProTune, and offers nice color correction and exposure controls - much better than iMovie can offer. After color correcting the clips, I’ll import them into iMovie and then deduplicate them using a script so that I can still use GoPro Studio to make further color tweaks while editing in iMovie. I can then use iMovie, which I quite like, to edit my videos, add music, etc.

Unfortunately, that workflow is now broken because iMovie no longer recognizes the CFHD video format. It can import the original, pre-converted videos from the GoPro, but thanks to the ProTune recording mode, those videos require extensive color manipulation to look good (which GoPro studio does as part of its conversion process). To work around this limitation, I’ll either have to switch to doing all my video editing in GoPro Studio (which is pretty limited) or export my videos to an h.264 encoding from GoPro Studio so iMovie can use them. I’m not really excited about the latter option as that means yet a third copy of my video, and I won’t be able to tweak videos in GoPro Studio after I’ve exported them.

I’m not sure exactly what’s going on, but if I were to hazard a guess it’s that OS X Yosemite and iMovie 10.0.0.6 are continuing with Apple’s migration away from Quicktime (which allowed for third-party video codec plugins, like CineForm’s CFHD plugin) to AV Foundation, the media framework from iOS that Apple has brought back across to OS X. Unlike Quicktime, AV Foundation only supports a limited set of video formats, and does not allow for external plugins that add support for other formats. This is why, for example, Perian no longer works. I had hoped that iMovie, being cut from the same codebase as Final Cut Pro, would be exempt from this dumbing-down. I wonder why this happened, without announcement, and in a point release of the software. I’m also not sure, if this is really the case, what GoPro/Cineform could do about it now that Apple has closed off any avenue for third parties to extend OS X’s media capabilities. It certainly doesn’t make me want to jump up to Final Cut Pro and wonder whether things would be better supported there.

That said, I haven’t done a lot of extra research to validate my theory. I haven’t confirmed that other formats no longer work with iMovie, and I haven’t tried a Mac with Yosemite but without the new iMovie to help narrow down which one may have introducted the change.

I’ve searched around for reports of other people having this problem, and I’ve found a few Apple support forum posts (no answer) but not much else. I opened a support ticket with GoPro, but they were clueless and eventually stopped responding to me. My hope is that by documenting this problem, this post will at least be somewhere for others in my situation to commiserate, or even better, to tell me I’m wrong and I just need to do X to fix everything.

Hard linking videos to save space in your iMovie library

,

After an initial adjustment period, I’ve come to quite enjoy the new iMovie (2013). While it initially appears to be oversimplified, it actually still has most of the editing and organizational features that were available in older versions of iMovie, and it moves to a Final Cut Pro X based backend that is much faster and more powerful. In fact, it’s pretty clear that the new iMovie is just a reskinned, limited version of Final Cut Pro X. The best part about this is that many operations that used to block and make you wait in older iMovies are now done asynchronously, allowing you to keep working while clips import, movies render, or stabilization is analyzed. This is a huge win even for the small, simple videos that I put together of scuba diving or flying my quadcopter.

One thing about the new iMovie that I strongly dislike is that it now consolidates all your files into an opaque “library” which can only be used by a single application. Any videos that you import into iMovie get copied into this monolithic library, and the individual files cannot be accessed from any other application. This means that you can’t use other editing tools on your video – for example, I prefer use the free GoPro Studio app to do color correction for my GoPro videos, but I can’t open the copies inside the iMovie library. iPhoto works in a similar way, wher all your photos get placed inside a library and are no longer accessible to other tools like Pixelmator. I find this frustratingly restrictive. I prefer to use the filesystem to organize my files, and to be able to use multiple tools in my workflow.

The other problem with the library concept is that iMovie copies videos into its library, meaning you now have two copies on your disk. I have a 512GB SSD on my MacBook, so I don’t have the space to leave duplicate files everywhere. I suppose Apple intends for you to only keep the copy in your iMovie library, but like I said, I prefer to have my files exposed on the filesystem so I can edit them or organize them individually.

To work around these problems, I wrote a very simple Ruby script called dedup-imovie-library. It’s available on GitHub, and you can just drop it into some location on your PATH. The script simply searches your iMovie library (which is really a folder that the Finder treats specially) for movie clips, and finds matching files in a second folder that you specify (the original source of those clips). When it finds a match, it deletes the copy in your iMovie library and replaces it with a hard link to the original.

For example, if my library is called iMovie Library.imovielibrary and my originals are in a folder called originals, I can just open Terminal and run:

cd ~/Movies
dedup-imovie-library iMovie\ Library.imovielibrary originals

Now, those files will exist in two locations but only take up space on disk once, because they’re hard linked to the same file. As an additional benefit, any editing I do to the originals (like color correction) shows up in iMovie, because they’re both using the same file.

There are a few caveats:

  • You still have to import your files into iMovie using the Import command, and wait for them to be fully copied before you run the script.
  • You should close iMovie before using the script, to avoid issues when the clip is replaced.
  • You can only do this when your originals are on the same disk as your iMovie library - hard links can’t go across disks.
  • Backup software like CrashPlan and Time Machine don’t really understand hard links, and will still back up two copies of your files.

Another option besides hardlinking the files together is to use a symbolic link instead. Symbolic links are simply a pointer to the original file, and as far as I can tell iMovie 2013 has no problem with using them. Symbolic links would solve the problems of not being able to link across disks, and would not take up double space in backups. However, iMovie ‘11 had a lot of weird behavior when using symbolically linked files (such as not being able to “favorite” sections of a clip) and I haven’t had a chance to test this with iMovie 2013. I’m also concerned about what would happen if I dragged an event into another library where the videos were stored as symbolic links. I’ll try out the alternative at some point and write another article if it works well.

Cleanly declaring AngularJS services with CoffeeScript

, , ,

I’ve recently fallen in love with AngularJS for building JavaScript applications. I’ve also come to rely on CoffeeScript to provide a more comfortable, concise syntax than plain JavaScript. It’s common to define many services when writing AngularJS applications. Services are just plain JavaScript objects that are registered with AngularJS’ dependency injection system, which makes them available to other parts of your application. If you have experience with Java, this will be familiar from Spring or Guice. I prefer to have very little logic in my controllers, and instead create a domain model from layers of services that each have their own responsibility.

One thing I’ve gone back and forth on is how best to declare AngularJS services using CoffeeScript. Let’s imagine a somewhat contrived example service named Tweets that depends on the built-in $http service. When it’s constructed it saves a timestamp, makes an HTTP call and saves the result to a property. Here’s a pretty straightforward way to declare this service using CoffeeScript’s class syntax:

app.service 'Tweets', ['$http', class Tweets
  constructor: (@$http) ->
    @timestamp = Date.now() - 900000
    @getNewTweets()

  getNewTweets: ->
    request = @$http.get '/tweets', params: { ts: @timestamp }
    request.then (result) =>
      @tweets = result.data
      @timestamp = Date.now()
]

This works pretty well. The first time this service is needed in the application, AngularJS will call new Tweets() and save that one (and only one) instance to be provided to any other code that requests it. Because AngularJS calls the Tweets constructor, the first call to getNewTweets is performed right away. But one thing bugs me - a reference to $http is saved as a property of the Tweets instance in the constructor. First, this results in some ugly-looking code like @$http thanks to AngularJS’ habit of naming services with $. It gets even worse when you depend on a lot of different things, and you now have to refer to them all via @ (which is this in CoffeeScript, by the way). Second, this exposes the $http service to anything that depends on Tweets. Anything that depends on Tweets can simply call Tweets.$http, which is a violation of encapsulation. It doesn’t look too bad in this example, but imagine a deep chain of services, each with its own responsibility, declared with this method. Any caller could reach down into that chain and pull out dependencies of dependencies. Or worse, they could change the reference to $http to point to something else.

Let’s try something else. If we are only ever going to have one instance of this class, why have a class at all? We can use the factory method instead of servicefactory just calls the function you provide instead of calling new on it - and have our factory function return a literal object:

app.factory 'Tweets', ['$http', ($http) ->
  obj = 
    timestamp: Date.now() - 900000

    getNewTweets: ->
      request = $http.get '/tweets', params: { ts: @timestamp }
      request.then (result) =>
        @tweets = result.data
        @timestamp = Date.now()

  obj.getNewTweets()

  obj
]

We’ve solved the problem of exposing $http, since now it’s simply captured by the function closure of our getNewTweets function, making it visible to that method but not elsewhere. However, we now have to assign our object to a variable so that we can do our initialization outside the object declaration before returning it. This is ugly, and it feels out of order. A more subtle problem is that stack traces and object dumps in the console will print this as Object, wheras in the first example it will say Tweets. Never underestimate the value of clear debug output.

There’s also a potential for confusion around CoffeeScript’s function binding fat arrow =>, which will bind to the this of the factory function if it’s used when declaring methods on the object literal. I actually ran into this problem when I wanted to bind a function to its object so it could be passed as a callback to another function, and ended up with it bound to the wrong this.

Note that I can declare timestamp as a property of the object literal in this form, wheras in the first version I set it in the constructor - this is because when CoffeeScript creates a class, all the properties are set on the prototype, not the instance, so you can’t store per-instance state there. Well, you can get away with it because AngularJS will only make one instance of your class, but you’re still modifying the prototype rather than the real instance, which isn’t what you want. It pays to understand exactly what CoffeeScript is generating for you.

Let’s go back to using class and try again:

app.factory 'Tweets', ['$http', ($http) ->
  class Tweets
    constructor: ->
      @timestamp = Date.now() - 900000
      @getNewTweets()

    getNewTweets: ->
      request = $http.get '/tweets', params: { ts: @timestamp }
      request.then (result) =>
        @tweets = result.data
        @timestamp = Date.now()

  new Tweets()
]

The difference between this and our first example are subtle. First, we’re using factory instead of service, like in the second example. This means instead of having our dependencies provided to the Tweets constructor, they’re provided to the factory function, and our declaration of the Tweets class can simply close over those parameters, meaning we no longer need to take them as constructor arguments. That solves the problem of $http being visible to other objects, and means we don’t need to write @$http. As I’ve explored AngularJS, I’ve actually found myself always using factory instead of service because it provides more flexibility in how I provide my service value.

However, we also have to be very careful to remember to actually instantiate our class at the end, since AngularJS won’t be doing it for us. That could be really easy to miss after a long class definition.

We can change this a little bit to make it better:

app.factory 'Tweets', ['$http', ($http) ->
  new class Tweets
    constructor: ->
      @timestamp = Date.now() - 900000
      @getNewTweets()

    getNewTweets: ->
      request = $http.get '/tweets', params: { ts: @timestamp }
      request.then (result) =>
        @tweets = result.data
        @timestamp = Date.now()
]

Now we call new right away to instantiate the class we’re defining. I think this is very clear, and there’s nothing after the class definition to forget. This is the pattern I’ve settled into whenever I declare singleton services – it’s clean, readable and concise, and it solves all the problems we’d identified:

  1. Dependencies of our service are not exposed.
  2. Our service will print with a meaningful name in the console.
  3. There is no out-of-order code, or extra code after the class declaration.
  4. We never have to put the characters @ and $ next to each other. Sorry, I’m still recovering from exposure to Perl and I can’t take it.

I’ve written up a more detailed example in this gist, which shows the pattern I’ve been using to produce ActiveRecord-style APIs with private dependencies. I hope this helps you write clean, understandable AngularJS services in CoffeeScript.

Casting the Apple of Eden from bronze

Early in August, my wife, Eva Funderburgh texted me from her bronze casting class:

Hey! I’m one of only two people in the class. I get as many investments as I want. Can you come up with a good plan to make an apple of Eden model by the time I’m home?

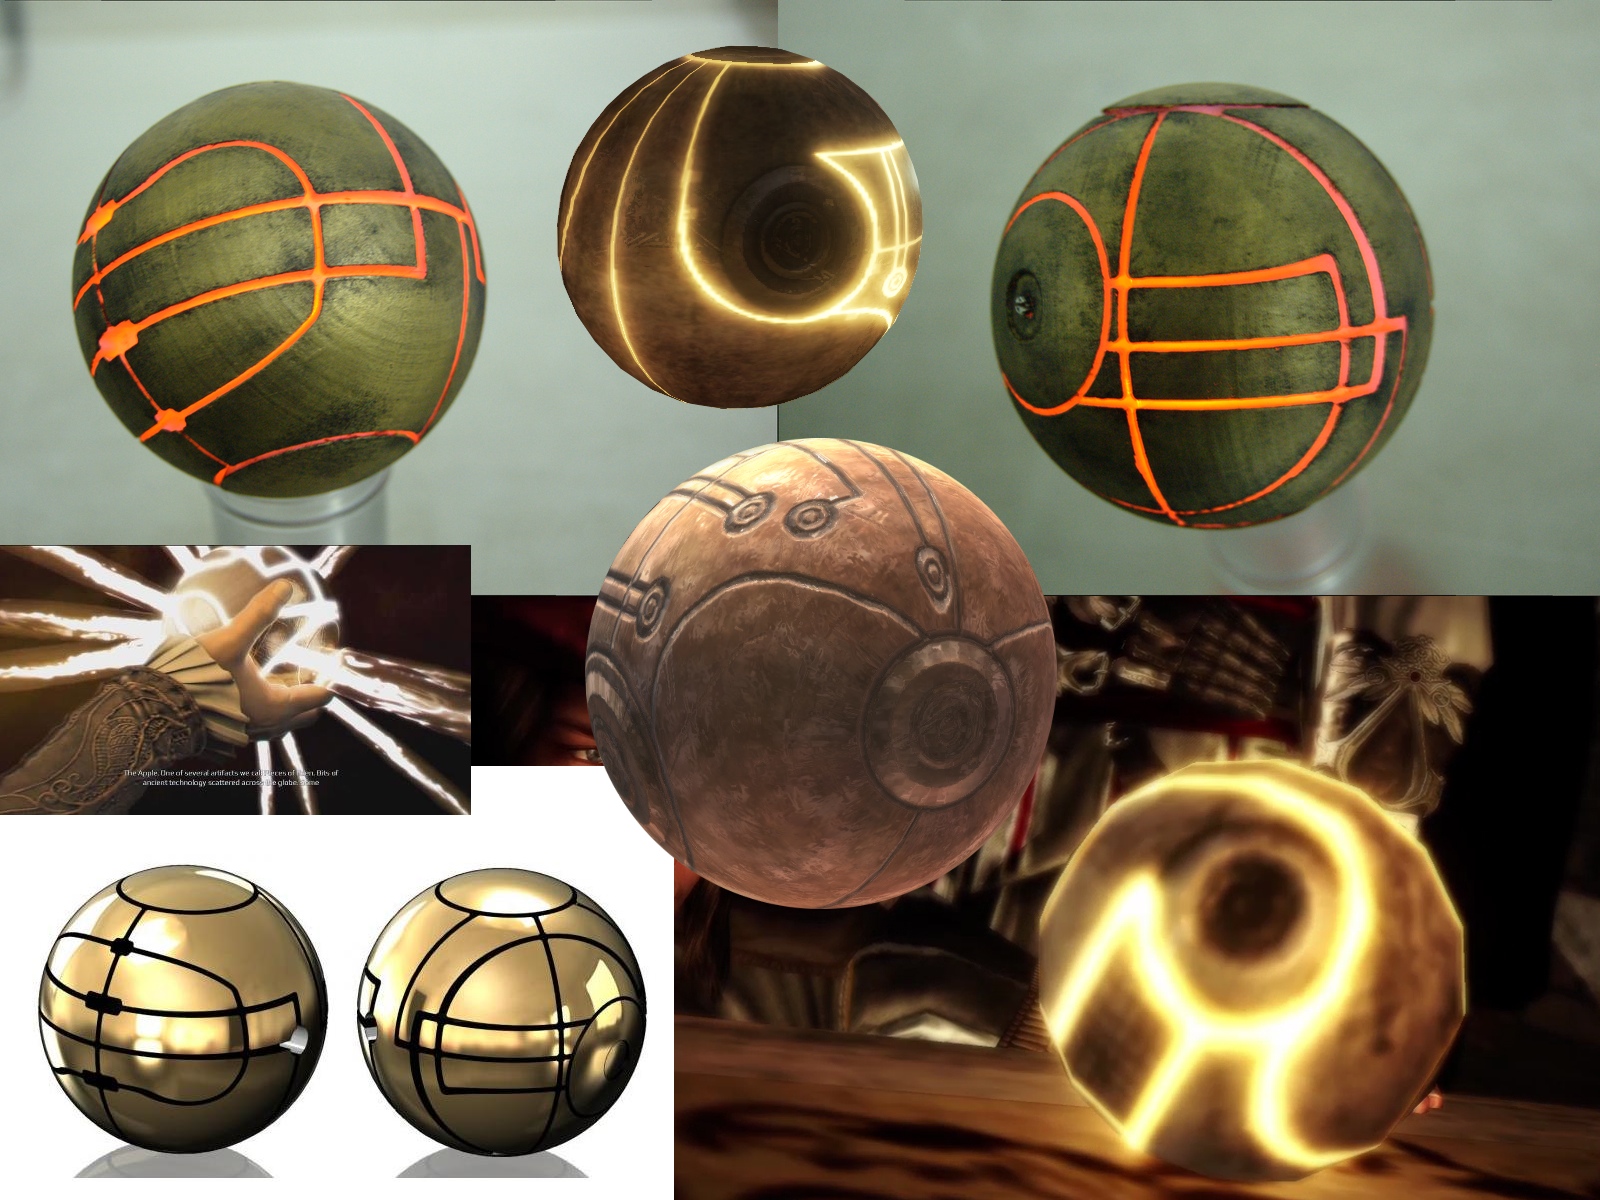
Until recently, I’ve been a big fan of the Assassin’s Creed series of video games, especially since it intersects with my interests in parkour and climbing, history, and science fiction. One of the key artifacts in the games’ fiction is the Apple of Eden, an ancient piece of technology that gives its owner magical powers and the ability to influence people’s minds. The plot of the games often focuses on finding or controlling these artifacts.

My wife had been branching out from ceramic sculpture to bronze casting, and we’d talked a bit about making a replica prop of the Apple out of bronze, but I never wanted to take up space and materials that she could use for her actual art. But now we had the opportunity, and better yet, a deadline. Within a week, we needed to have the wax form of the Apple built and ready.

The Apple of Eden

While I don’t build replica props myself (with the exception of this project), I enjoy reading Harrison Krix’s exhaustive build logs for the amazing props he builds. The rest of this article will detail how we designed and built a life-sized, illuminated replica of the Apple of Eden cast in bronze.

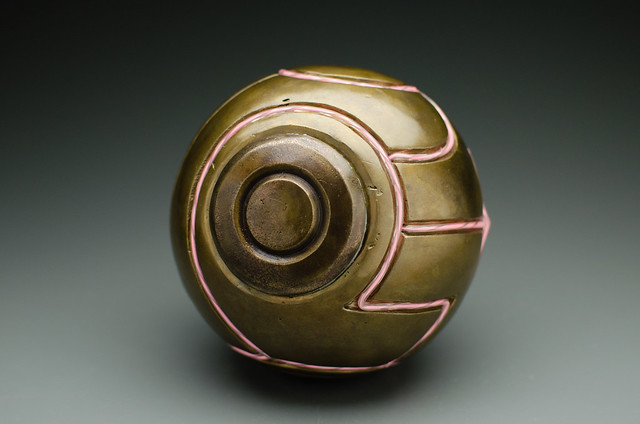
The first task was to actually design the Apple. We knew it needed to be a sphere, and from game screenshots we figured out a rough size based on how it looked in characters’ hands. More troublesome was the pattern on the surface of the sphere, which was hard to pick out from screenshots, and which was not consistent from shot to shot. We ended up designing our own pattern of channels inspired by the common patterns from screenshots and fan art.

Apple of Eden research

To start with, we needed a hollow wax sphere. In lost wax casting, a wax form gets encased in plaster and then melted out, and bronze is poured into the holes that are left behind. To get a good sphere shape, we made a plaster mold from a cheap toy ball that was already the right size.

Iron Man ball

First, half of the ball was covered in clay to make a “rim” for the plaster to form up against, and then we mixed up a batch of plaster and slopped it onto one side of the ball with our hands. As long as the interior surface is nice, it doesn’t matter what the outside looks like.

Eva with the bottom half of the mold

Plaster hardens in minutes, after which we removed the clay. The clay had some registration keys (little dots) in it so that it would be easy to pair up the two halves of the plaster mold again. A bit of clay was used to preserve the pour spout so we could pour wax into the finished mold.

Bottom half of the mold

Adding plaster for the top half

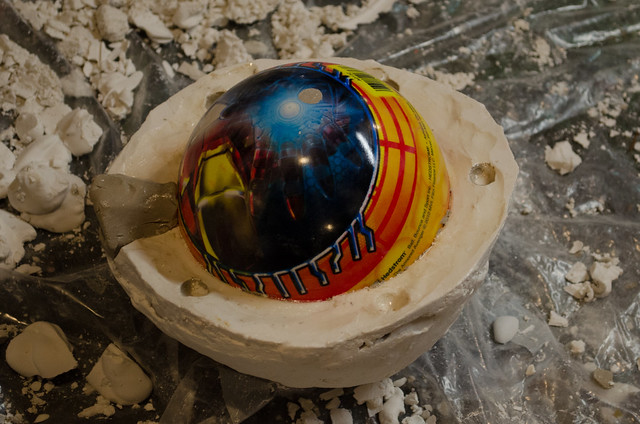
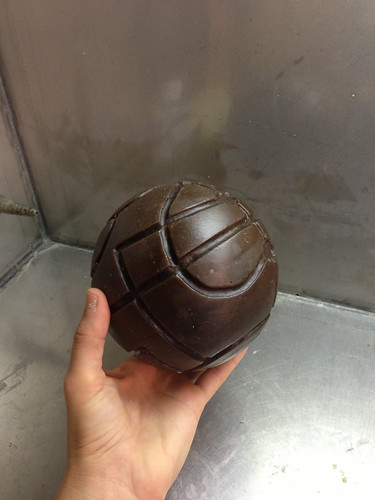
Once the mold was finished, we heated up casting wax in an old crock pot, and poured the wax into the mold. By pouring in wax multiple times and sloshing it around, we were able to get a mostly even shell of wax with a nice spherical outside. It was important to make sure the shell was still thick enough that I could carve the decorative channels in it without breaking through. We cast a few wax spheres so that we could experiment with different designs and carving techniques.

Heating wax

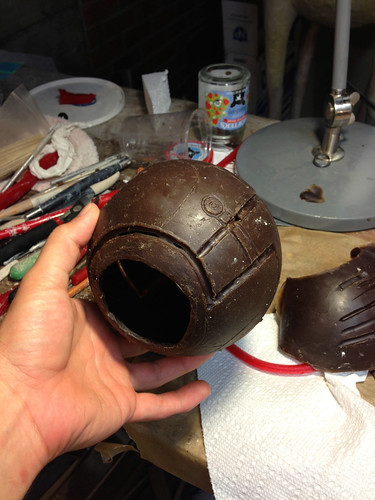
The channels were first drawn lightly on the wax, then carved in using a clay-working tool that has a looped blade at the end. I tried to make the depth nice and consistent, but this was all freehand. I didn’t mind a bit of variation because I wanted this to look like an ancient, handmade artifact rather than a machined, perfect piece. The pour spout was widened to provide a hole to stuff electronics into. Eva turned a cover for the hole on her potter’s wheel directly out of a bit of wax.

Carving the channels

At this point the wax looked generally good, but it had a lot of little nicks and scratches and even fingerprints from where I was working with it. Eva wiped the surface with turpentine, which smoothed out the surface quite a bit.

Smoothed with turpentine

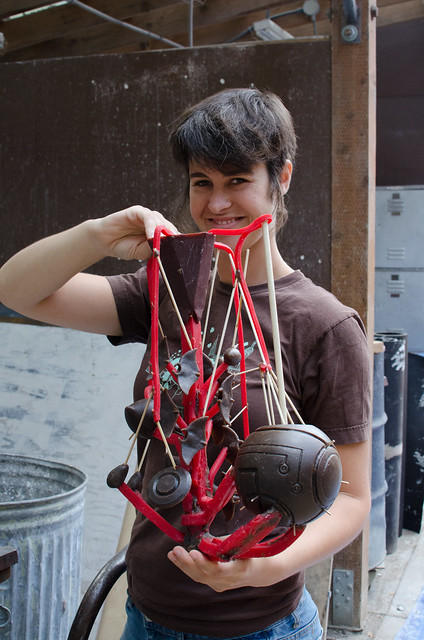
Once we were happy with the shape, Eva sprued the wax onto a sprue system that she was sharing with a bunch of other small pieces. Where many artists would make a single piece at a time, Eva makes complicated sprues of many small pieces, because her art is generally on the small side. The sprue system provided channels for the bronze to flow to the piece, and for air to escape as the bronze flowed through all the spaces. Eva had to build a complex system of large inlet paths with many small outlets, being careful to make sure that there was always a vent at the highest point in the piece, so that air bubbles wouldn’t get trapped. Finally, bronze pins were inserted at points around the sphere so that the plaster in the middle wouldn’t just drop when all the wax was melted out.

Sprue system

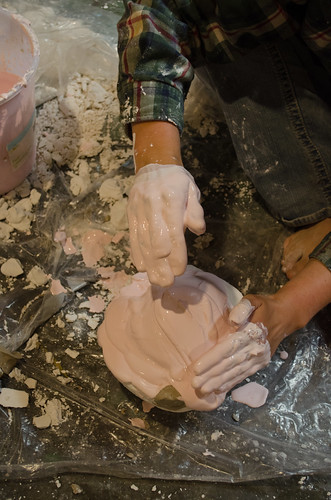
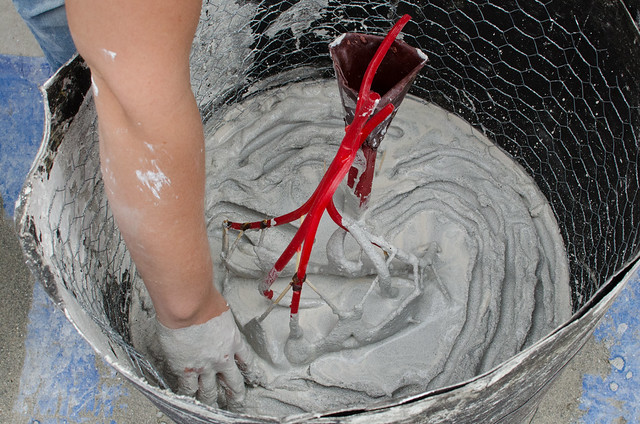
Then, we moved to Pratt Fine Arts Center, and all the sprued pieces were placed in cylinders made of tar paper and chicken wire, and filled with a mixture of sand and plaster. The sprue system was shaken a bit to get rid of bubbles and make sure the plaster got into every corner. The plaster cylinders, called “investments”, were then moved into a large kiln, upside down, and heated to 1200°F to melt out all the wax and burn out any other organic material (like the toothpicks used in the sprue system).

Investing the wax

We returned a week later for the bronze pour. We helped dig out the sand pit, and half-buried the investments in sand to contain any bronze in case they split open. Once the bronze had melted in the crucible, it was lifted up by a crane, and Eva helped pour the liquid bronze from the crucible into the pour holes in the investment. This video shows the process much more clearly:

The bronze inside the plaster investments cooled off in about a half hour, and we were able to take axes and hammers to the plaster to free the bronze within. After the pieces were separated from the plaster, they were pressure-washed to get rid of more plaster. The bronze looked super crufty at this point because of oxidation on the surface, and flashing and bubbles that had stayed in the investment and got picked up by the bronze.

Freed fro the investment

Taking the bronze home, we separated the pieces from the sprues using a cutting wheel on a die grinder or a hacksaw. The extra bronze from the sprue gets recycled for the next pour.

Cutting off the sprue

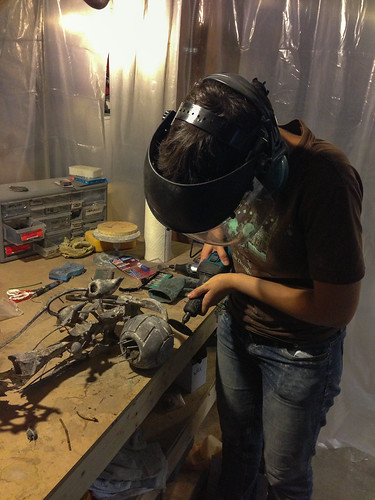
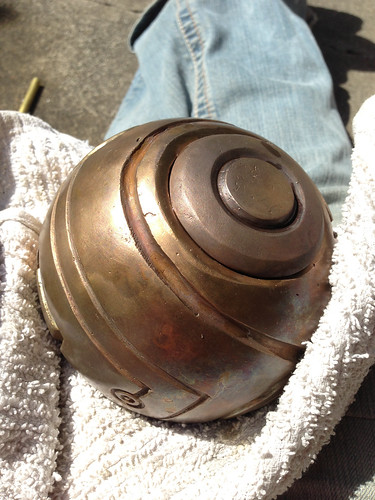
The bubbles were popped off with a small chisel, and then Eva went over the surface with a coarse ScotchBrite pad on her die grinder to smooth off the surface. She then took another pass with a fine ScotchBrite pad, and finished with a wire brush. The transformation is remarkable - at this point the Apple was glowing, bright metallic bronze.

Polished

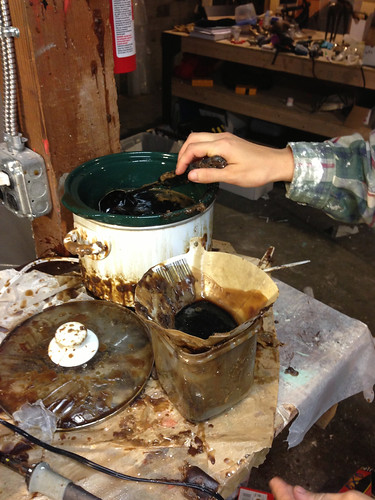
However, we didn’t want an Apple that looked brand new (or looked like shiny metal). This is supposed to be an ancient artifact, and fortunately there’s an entire world of bronze patinas that can be used to transform bronze surfaces with different colors and patterns. First, we tried applying a liver of sulfur and ferric nitrate patina, brushing on the solution while heating the surface of the bronze with a blowtorch. Unfortunately, there was a bit too much ferric nitrate, and a bit too much heat. The effect this produced was striking, with metallic, iridescent splatters forming over the smoother parts of the Apple, and a dark red patina for the rest.

First patina

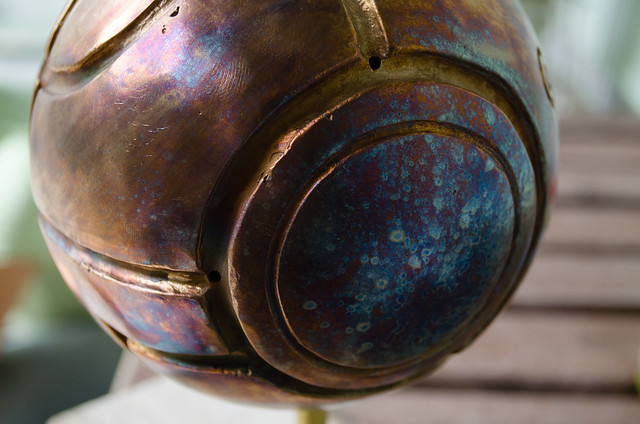
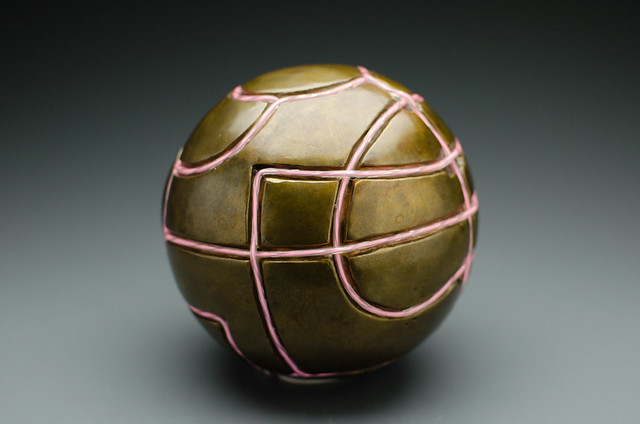
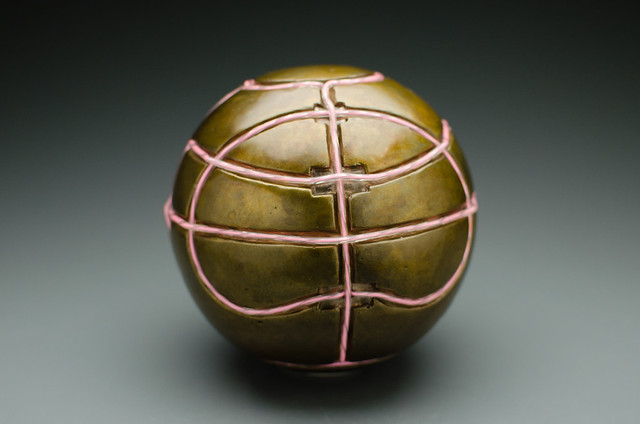
As cool as this patina looked, it wasn’t exactly what we were looking for, but one of the nice things about bronze is that you can always just remove the patina and start over. Eva scrubbed off this patina with a wire brush, and tried again, this time with less ferric nitrate and going lighter on the blow torch. Despite using the same process, the result was very different - a dark, aged bronze that was perfect for the Apple. Eva sprayed on some Permalac to seal in the patina.

Second patina

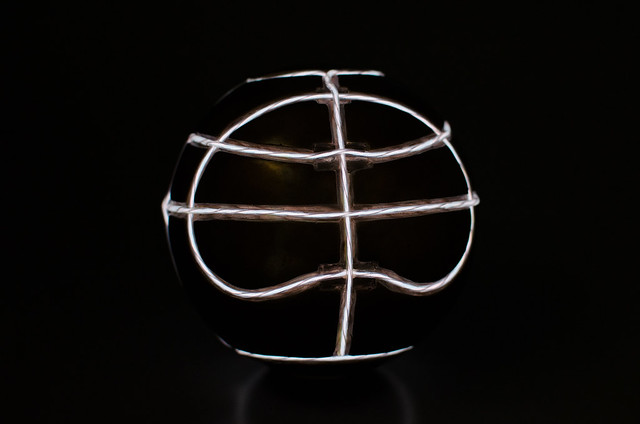
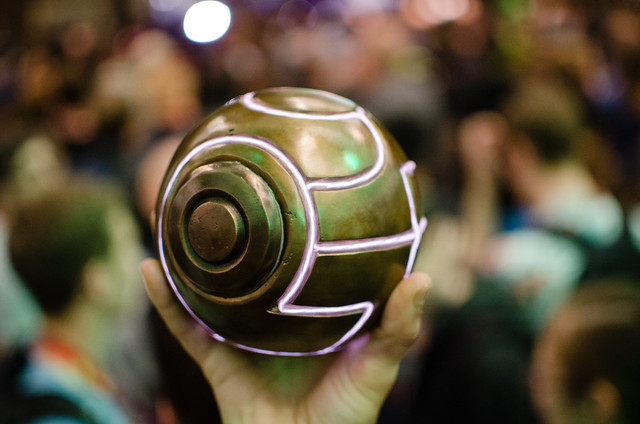
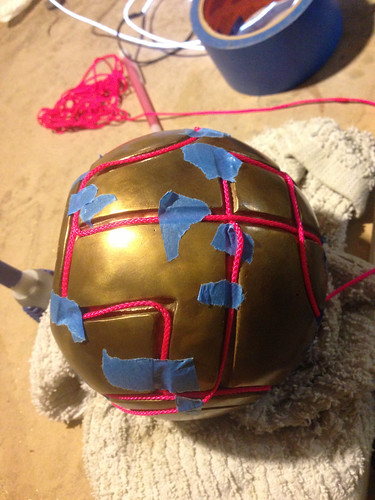
One feature I was particularly excited about was lighting. The Apple glows along its surface channels, and I planned on using EL wire to provide this effect. EL wire glows uniformly along its length, uses very little power, and looks very bright in low light. First, Eva polished the inside of the channels with a wire brush to provide a bright reflection of the wire. Then, I worked out how to take the EL wire I had bought and work it into all the channels in a single continuous line with a minimum of overlap. This required drilling holes in strategic intersections and running some of the wire internal to the sphere. We tried some different options for attaching the wire, like silicone caulk with glow-in-the-dark powder mixed into it, but in the end it looked best to just superglue the wire into the channels. The battery pack and transformer fit snugly inside the sphere and connected to one end of the glowing wire.

Planning EL wire

The last bit to figure out was the cap. Since it was cast from bronze, it was hard to make it mate up with the hole in the sphere perfectly, so we hadn’t bothered. We bridged the gap by heating up some Shapelock plastic, forming it around the base of the cap, and then pressing it into the hole. We trimmed all the excess plastic so it wasn’t visible. Once the Shapelock cooled, it formed a perfectly fitting seal that allowed us to press the cap onto the sphere and it would stay put unless pried off with fingernails.

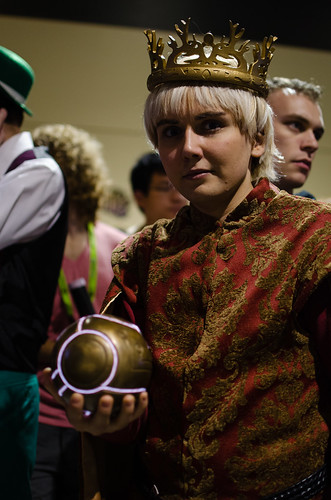
We really had two deadlines – the first was the bronze pour, but we also wanted to have the Apple finished in time for PAX, a big gaming convention that’s held every year in Seattle. We didn’t have time for full Assassin’s Creed costumes, so instead we carried the Apple around the show and took pictures of other video game characters holding the Apple. Oddly, we didn’t find any Assassin’s Creed cosplayers.

Joffrey with the Apple

I’m really glad that we got the opportunity to work on this fun and nerdy project. The Apple sits on my mantle now, and it’s fun to light up and hold – there’s no substitute for the weight and feel of real metal. I plan to bring the Apple with me to PAX again next year.

You can view all the progress photos and PAX photos on Flickr.

Front of the Apple Side of the Apple Back of the Apple Back, lit