'Random' Articles

Casting the Apple of Eden from bronze

Early in August, my wife, Eva Funderburgh texted me from her bronze casting class:

Hey! I’m one of only two people in the class. I get as many investments as I want. Can you come up with a good plan to make an apple of Eden model by the time I’m home?

Until recently, I’ve been a big fan of the Assassin’s Creed series of video games, especially since it intersects with my interests in parkour and climbing, history, and science fiction. One of the key artifacts in the games’ fiction is the Apple of Eden, an ancient piece of technology that gives its owner magical powers and the ability to influence people’s minds. The plot of the games often focuses on finding or controlling these artifacts.

My wife had been branching out from ceramic sculpture to bronze casting, and we’d talked a bit about making a replica prop of the Apple out of bronze, but I never wanted to take up space and materials that she could use for her actual art. But now we had the opportunity, and better yet, a deadline. Within a week, we needed to have the wax form of the Apple built and ready.

The Apple of Eden

While I don’t build replica props myself (with the exception of this project), I enjoy reading Harrison Krix’s exhaustive build logs for the amazing props he builds. The rest of this article will detail how we designed and built a life-sized, illuminated replica of the Apple of Eden cast in bronze.

The first task was to actually design the Apple. We knew it needed to be a sphere, and from game screenshots we figured out a rough size based on how it looked in characters’ hands. More troublesome was the pattern on the surface of the sphere, which was hard to pick out from screenshots, and which was not consistent from shot to shot. We ended up designing our own pattern of channels inspired by the common patterns from screenshots and fan art.

Apple of Eden research

To start with, we needed a hollow wax sphere. In lost wax casting, a wax form gets encased in plaster and then melted out, and bronze is poured into the holes that are left behind. To get a good sphere shape, we made a plaster mold from a cheap toy ball that was already the right size.

Iron Man ball

First, half of the ball was covered in clay to make a “rim” for the plaster to form up against, and then we mixed up a batch of plaster and slopped it onto one side of the ball with our hands. As long as the interior surface is nice, it doesn’t matter what the outside looks like.

Eva with the bottom half of the mold

Plaster hardens in minutes, after which we removed the clay. The clay had some registration keys (little dots) in it so that it would be easy to pair up the two halves of the plaster mold again. A bit of clay was used to preserve the pour spout so we could pour wax into the finished mold.

Bottom half of the mold

Adding plaster for the top half

Once the mold was finished, we heated up casting wax in an old crock pot, and poured the wax into the mold. By pouring in wax multiple times and sloshing it around, we were able to get a mostly even shell of wax with a nice spherical outside. It was important to make sure the shell was still thick enough that I could carve the decorative channels in it without breaking through. We cast a few wax spheres so that we could experiment with different designs and carving techniques.

Heating wax

The channels were first drawn lightly on the wax, then carved in using a clay-working tool that has a looped blade at the end. I tried to make the depth nice and consistent, but this was all freehand. I didn’t mind a bit of variation because I wanted this to look like an ancient, handmade artifact rather than a machined, perfect piece. The pour spout was widened to provide a hole to stuff electronics into. Eva turned a cover for the hole on her potter’s wheel directly out of a bit of wax.

Carving the channels

At this point the wax looked generally good, but it had a lot of little nicks and scratches and even fingerprints from where I was working with it. Eva wiped the surface with turpentine, which smoothed out the surface quite a bit.

Smoothed with turpentine

Once we were happy with the shape, Eva sprued the wax onto a sprue system that she was sharing with a bunch of other small pieces. Where many artists would make a single piece at a time, Eva makes complicated sprues of many small pieces, because her art is generally on the small side. The sprue system provided channels for the bronze to flow to the piece, and for air to escape as the bronze flowed through all the spaces. Eva had to build a complex system of large inlet paths with many small outlets, being careful to make sure that there was always a vent at the highest point in the piece, so that air bubbles wouldn’t get trapped. Finally, bronze pins were inserted at points around the sphere so that the plaster in the middle wouldn’t just drop when all the wax was melted out.

Sprue system

Then, we moved to Pratt Fine Arts Center, and all the sprued pieces were placed in cylinders made of tar paper and chicken wire, and filled with a mixture of sand and plaster. The sprue system was shaken a bit to get rid of bubbles and make sure the plaster got into every corner. The plaster cylinders, called “investments”, were then moved into a large kiln, upside down, and heated to 1200°F to melt out all the wax and burn out any other organic material (like the toothpicks used in the sprue system).

Investing the wax

We returned a week later for the bronze pour. We helped dig out the sand pit, and half-buried the investments in sand to contain any bronze in case they split open. Once the bronze had melted in the crucible, it was lifted up by a crane, and Eva helped pour the liquid bronze from the crucible into the pour holes in the investment. This video shows the process much more clearly:

The bronze inside the plaster investments cooled off in about a half hour, and we were able to take axes and hammers to the plaster to free the bronze within. After the pieces were separated from the plaster, they were pressure-washed to get rid of more plaster. The bronze looked super crufty at this point because of oxidation on the surface, and flashing and bubbles that had stayed in the investment and got picked up by the bronze.

Freed fro the investment

Taking the bronze home, we separated the pieces from the sprues using a cutting wheel on a die grinder or a hacksaw. The extra bronze from the sprue gets recycled for the next pour.

Cutting off the sprue

The bubbles were popped off with a small chisel, and then Eva went over the surface with a coarse ScotchBrite pad on her die grinder to smooth off the surface. She then took another pass with a fine ScotchBrite pad, and finished with a wire brush. The transformation is remarkable - at this point the Apple was glowing, bright metallic bronze.

Polished

However, we didn’t want an Apple that looked brand new (or looked like shiny metal). This is supposed to be an ancient artifact, and fortunately there’s an entire world of bronze patinas that can be used to transform bronze surfaces with different colors and patterns. First, we tried applying a liver of sulfur and ferric nitrate patina, brushing on the solution while heating the surface of the bronze with a blowtorch. Unfortunately, there was a bit too much ferric nitrate, and a bit too much heat. The effect this produced was striking, with metallic, iridescent splatters forming over the smoother parts of the Apple, and a dark red patina for the rest.

First patina

As cool as this patina looked, it wasn’t exactly what we were looking for, but one of the nice things about bronze is that you can always just remove the patina and start over. Eva scrubbed off this patina with a wire brush, and tried again, this time with less ferric nitrate and going lighter on the blow torch. Despite using the same process, the result was very different - a dark, aged bronze that was perfect for the Apple. Eva sprayed on some Permalac to seal in the patina.

Second patina

One feature I was particularly excited about was lighting. The Apple glows along its surface channels, and I planned on using EL wire to provide this effect. EL wire glows uniformly along its length, uses very little power, and looks very bright in low light. First, Eva polished the inside of the channels with a wire brush to provide a bright reflection of the wire. Then, I worked out how to take the EL wire I had bought and work it into all the channels in a single continuous line with a minimum of overlap. This required drilling holes in strategic intersections and running some of the wire internal to the sphere. We tried some different options for attaching the wire, like silicone caulk with glow-in-the-dark powder mixed into it, but in the end it looked best to just superglue the wire into the channels. The battery pack and transformer fit snugly inside the sphere and connected to one end of the glowing wire.

Planning EL wire

The last bit to figure out was the cap. Since it was cast from bronze, it was hard to make it mate up with the hole in the sphere perfectly, so we hadn’t bothered. We bridged the gap by heating up some Shapelock plastic, forming it around the base of the cap, and then pressing it into the hole. We trimmed all the excess plastic so it wasn’t visible. Once the Shapelock cooled, it formed a perfectly fitting seal that allowed us to press the cap onto the sphere and it would stay put unless pried off with fingernails.

We really had two deadlines – the first was the bronze pour, but we also wanted to have the Apple finished in time for PAX, a big gaming convention that’s held every year in Seattle. We didn’t have time for full Assassin’s Creed costumes, so instead we carried the Apple around the show and took pictures of other video game characters holding the Apple. Oddly, we didn’t find any Assassin’s Creed cosplayers.

Joffrey with the Apple

I’m really glad that we got the opportunity to work on this fun and nerdy project. The Apple sits on my mantle now, and it’s fun to light up and hold – there’s no substitute for the weight and feel of real metal. I plan to bring the Apple with me to PAX again next year.

You can view all the progress photos and PAX photos on Flickr.

Front of the Apple Side of the Apple Back of the Apple Back, lit

Securely and conveniently managing passwords

Good password security habits are more important than ever, but it can be hard to take the common advice about using complex, unique passwords when they’re so inconvenient to manage. This article explains why password security is such a big deal, and then lays out a strategy for managing passwords that can tame your accounts without causing an undue burden.

The safety of your online passwords has always been important, but in the last year or so it’s become even more clear that extra care needs to be taken with your account credentials. Passwords have been stolen from PlayStation Network, Steam, LinkedIn, Last.fm, eHarmony, and more. This problem is only going to get worse as exploits become more sophisticated and more services reach millions of users without investing in information security. Furthermore, advances in computing power mean that cracking stolen databases of passwords is getting easier and easier.

The way these hacks usually go is that, via some software flaw, somebody manages to steal the database containing user account information for a service. Sometimes, that’s enough to gain access to the stolen accounts, because the passwords were stored as plain text. One warning sign that a site does this is that they’ll offer the option to send you your password if you forget it, rather than letting you reset the password to a new one. If they can send you your password, then they know it, and if they know it, somebody who steals the database can know it too.

More frequently, passwords are “hashed” – a process that makes it easy to tell if a user has entered the correct password, but very difficult to actually recover the password. However, that’s not enough to prevent data thieves from figuring out the passwords. They use huge, pre-computed lists of common passwords and their hashes called “rainbow tables” to figure out which password was used for which account. There are defenses against this sort of attack, but even large, established sites like LinkedIn didn’t use them. This is one of the reasons why common passwords (like “password”) are so easy to crack – they’re right at the top of rainbow tables (which may contain hundreds of millions of other passwords too).

Given all that, the real problem starts when somebody uses the same password on multiple services. Imagine you use the same password for a gardening forum and your email. The gardening forum software contains a flaw that allows hackers to steal the user database and figure out the passwords. They then take those usernames and passwords to popular email services and try them out. Since the password is the same, they get right in, and have full access to your email. But that’s not all – once somebody has access to your email, they can reset passwords for all the other services you use, including juicy targets like online banking. And they’ll know what to go after by simply reading your emails. This sort of cross-service attack happened a lot after the PlayStation Network breach. The thieves took the PSN passwords they’d gotten and rightly assumed that those passwords would work on Xbox Live, where they were able to make lots of purchases using the accounts’ linked credit cards. More recently, World of Warcraft and Diablo 3 players have had their accounts taken over to sell off their gold and items, likely by people using stolen PSN, Steam, and LinkedIn account information.

Some people try to protect themselves by having a few different passwords that they reuse – one for “secure” systems like online banking, one for common things like email, and one for “everything else”. The problem is that your account security is only as good as the weakest link. Once one password falls into the wrong hands it can be used to break into more and more other services, and each newly compromised account can be a stepping stone to more sensitive targets. This need not even be as straightforward as what they get by gaining access to your email. For example, let’s say somebody gains access to your Facebook account. From there, they may be able to pull enough personal information to answer challenge questions (What’s your mother’s maiden name? Where were you born?) at your bank’s website. Or maybe they’ll just stop there and use your Facebook account to spam your friends with links to malware sites.

In an ideal world, you want to use long, complex passwords that are different for every service you have an account with. Long, complex passwords are much less likely to be found in rainbow tables, so even if a user database is stolen, your password isn’t likely to be one of the ones recovered. Having a unique password per site means that if thieves do figure out your password, they will only have access to your account on one service, not many. Plus, your response to hacks you know about (many go undetected or unreported) is to just change your password on that one site, instead of having to retire a password used all over the Internet.

Fortunately, it turns out that keeping track of hundreds of unique, complex passwords can be done, and it can be reasonably convenient. I manage separate passwords for every account, and I’m going to explain how so you can too.

Disclaimer: This is not the be-all and end-all of password security. There are weaknesses in my strategy, but I believe it provides enough security benefit along with enough convenience that it will protect most people from common attacks.

The first thing you need is a password vault. A password vault is an application that remembers your passwords for you – the vault is encrypted, and it has a password itself that lets you open it. Think of this like taking all your keys and locking them up in a mini-safe when you’re not using them. The password vault allows you to remember a unique password for every site and get at them all with a single password that you can change any time you like. Good password vaults also let you store other information you might forget, like account numbers and challenge question answers (I like to make random answers to challenge questions too, to protect against attackers who can figure out the real answer). And, as a bonus, the vault serves as a directory of all the sites you actually have accounts on - before I moved my passwords into a vault, I had no real idea of all the different services I had created an account on.

The vault I’ve chosen to use is KeePassX. I like it because it’s very secure, it’s free, and it runs on many different operating systems (I regularly use OS X, Windows, Linux, and iOS machines). There are other perfectly good password vaults like 1Password and LastPass. What’s important is that you choose one and use it.

KeePassX Logo

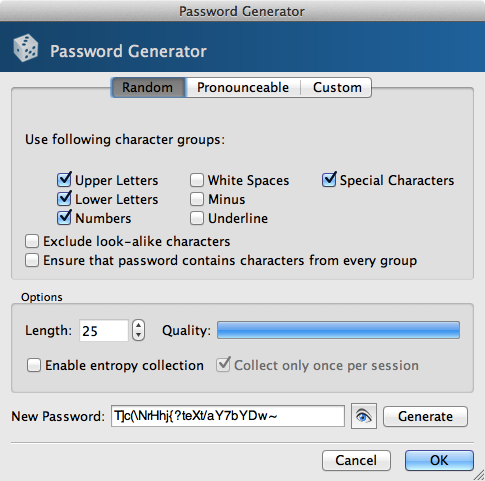
Once the vault is installed, it’s time to fill it up with your passwords. First, choose a master password. This should be easy to memorize and you should change it every few months. Next, add in all the accounts you can remember, along with their current password. I listed them all out first so I’d know what passwords I needed to change, but you can also change the password for each account as you enter them. For each account, find the “change password” feature and use your vault’s password generator to choose a new, completely random password. Ideally this password should be long – more than 16 characters. Note that some sites impose odd restrictions on your passwords, so you might need to play with the options to generate a password the site will accept. The worst are the sites that don’t say there is any restriction on password length, but when you paste in your new password, they clip it to a certain length. This causes the password you save in your vault to not match what the site saved, and you won’t be able to log in. I have a Greasemonkey script (which works on Firefox and Google Chrome) that will show these limits even if the site doesn’t. Another thing you can do is to immediately log out of a site after changing your password, and log back in. That way, if there’s a problem, you know about it right away and can fix it then.

KeePassX Password Generator

Once you’ve gotten all the accounts you can think of, it’s time to find the ones you can’t remember. Search the Internet for your name, usernames you use, and your email address, and you’ll find accounts you’ve totally forgotten about – old forum accounts, services you tried once and dumped, etc. If you’re lucky, you can just delete your account, but few services offer such an option. In that case, just change the password and add the account to your vault.

At this point, you have a complete record of all your online accounts, and each one should have a unique, random password. I’ve done this myself with the exception of a few accounts where I have to enter my password frequently on my phone (mostly my iTunes password) – entering a 30-digit random password every time would be impossible. In that case, I have a memorizable password that I change frequently and only use on those services, and I mix in some unique bit to each of them. For example, if the base password is “fuzzydog” (it’s not), my iTunes password might be “fuzzydogappstore”. It’s certainly not as secure as fully random passwords, but I can remember it, and I’m not using it anywhere else.

Now, when you need to log into a site, just open up the password vault, find the right entry, and copy/paste the password into the site or application you’re using. To make this less of a burden, I’d recommend using the password saving features of your browser. The only thing to keep in mind is that this lets anyone who gets ahold of your computer log into those sites – you should configure your computer to lock and require a password if the screensaver comes on, to foil anyone who’d walk up to your computer while you’re gone and try to mess with it.

The next step is to make sure your vault is available wherever you need it. For this I use the file-synchronization service Dropbox (which everyone should be using already). Dropbox shows up as a folder on your computer, and whatever you put in it shows up on all your other computers. In fairness, there are other good services you could use like SkyDrive, Box, or Google Drive, but I like Dropbox the best. Once you’ve got Dropbox installed, move your vault into it, and now you have access to the latest version of your vault on all of your computers. I also store the actual KeePassX software in Dropbox so that when I start using a new computer I can just install Dropbox and have everything ready to go immediately.

Dropbox Logo

For my iOS devices, I’ve installed the PassDrop app. PassDrop can read your password vault straight out of Dropbox, so you also have your passwords on your phone. You can then use the phone’s copy/paste feature to get the passwords from PassDrop to wherever they need to be. I’m sure there are similar apps for other mobile operating systems, but I don’t have experience with them.

That’s pretty much it. At this point, you’ll have instant access to all your passwords wherever you go – no more forgetting which password you used on some obscure site when you signed up years ago, and much less risk of getting your accounts hijacked or broken into. And when the next big site loses their passwords, you’ll be able to change your password there, update your vault, and get on without worrying.

Bonus: One thing you can do to go above and beyond this level of security is to take advantage of “two-factor authentication” where it’s offered. With two-factor authentication, you log in both with something you know (your password) as well as something you have (often your mobile phone). Google offers this through their Google Authenticator phone app and it’s a great idea given how much is tied into your Google Account these days, especially when email is such a juicy target. Facebook also offers a similar feature which is worth turning on, as do Blizzard and PayPal. Many banks offer this too. Sometimes it’s an app, and sometimes they just send you a code via SMS. Turning this feature on means that even if somebody steals your password, they’d also need to steal your phone to log into your account. I enable these wherever I find them.

Fixing a Nerf Stampede that only shoots in certain orientations

My friend Mark got me one of the awesome Nerf Stampede dart guns for Christmas. It’s a fully automatic Nerf gun that takes clips of darts - perfect for the sort of inter-office foam wars that break out with alarming regularity these days.

Unfortunately, right out of the box there was a bit of a problem (aside from the fact that I had to locate 6 D batteries - who uses those anymore?) The gun would only fire in certain orientations - only if it was held sideways, or pointing down, or even upside down. It wasn’t consistent, either. Pulling the trigger wouldn’t do anything at all - no noise, no motion. I figured there was probably a switch that wasn’t getting pressed except when it was held in a certain way. I took the whole thing apart trying to figure out what was going on. There’s a lot of really fascinating little plastic parts and switches and linkages in there, and the mechanism for how it fires the darts is pretty ingenious, but there was nothing obviously wrong. Since there was nothing mechanically out of place, I broke out a multimeter and started testing electrical connections. That led directly to the battery compartment - there wasn’t any voltage on the terminals at all! Rotating the batteries around in space, there were certain orientations where a voltage would show up, but mostly it was dead. After popping out the batteries, I had a theory as to why.

For some reason, the little indentation for the battery contact is facing outwards, instead of inwards toward the battery. The battery has a similar protruding bit that’s actually sitting inside the contact instead of making a connection with it. The solution was pretty simple - a bit of copper wire bent and stuck in between the contact and the battery to make sure that there was a solid connection. You could probably get away with using a paperclip in there.

After that little fix, my Stampede always fires no matter how I’m holding it, and I have a reliable toy to battle opposing teams at work or just let my co-workers know that it’s time for the stand-up.

P.S.: If you want to build great software in a relaxed workplace and you can take the occasional Nerf dart in the back of the head, let me know.

Water Heater Cost / Payback Calculator

For the few months my wife and I have been trying to decide on a new water heater. After moving into our new place, we realized that the existing electric tank water heater wasn’t working right since the temperature of our showers steadily got colder. It was suggested that one of the heating elements was busted, but I wasn’t interested in getting it repaired since the heater was way older than the expected lifetime of an electric heater. However, there are a lot of choices for a replacement. Another electric tank water heater would be cheap, a gas tank heater would be cheaper to run but require running a gas line, and there are tankless water heaters which are much more expensive but are cheaper to operate and don’t have to keep a whole tank of water heated up all the time for the few times you use it.

There are a number of ways out there for you to figure out how the cost of installation and purchase balance out with the cost of operation over time. You can always make your own Excel spreadsheet to figure it out, or you can use calculators like this one from energy.gov. However, all the web payback calculators I’ve seen have had clunky 90s interfaces, don’t take into account all the variables, and most importantly, don’t let you compare multiple types of heaters at the same time. So, like any good software developer, I built my own.

My water heater calculator is based on the same calculations used on the Federal Energy Management Program site, with the addition of inputs for your hot and cold water temperature. It’s also more flexible about how you enter your water usage. But the best part is that you can enter as many different water heaters as you want and they’ll all be graphed against each other, taking into account the lifetime of the unit. Get multiple bids, try different models, compare gas and electric. By displaying them as a graph of total cost over time, you can see where each heater breaks even with each other, and how much savings you’re getting by the end.

As a bonus, the calculator will also calculate how much you may be able to claim as part of the Energy Star Federal Tax Credit program. It’s smart enough to know the rules about the credits (gas heaters >e; 0.82 efficiency only, 30% of total cost up to $1500), and you can choose not to use the rebate if you’ve already used it up this year or don’t plan on applying it to your heater.

You can get started with the calculator by filling in values for your water usage and resource costs, or accept the defaults. Then add as many heaters as you like, entering in the cost for purchase and installation, the Energy Factor (which should be in the documentation for the heater), and the estimated lifetime of the heater. The more accurate you can make the numbers, the better your cost projection will be. Then check out the graph to see what your total expenditure will be after every year. If you’re comparing a new heater with the option of keeping your existing heater, just set the Cost to $0 and reduce the lifetime to how long you expect your existing heater to last.

Hopefully this little tool will be helpful to anyone else looking to replace their water heater. I filled it out for a combination of several electric, gas tanked, gas tankless, and heat-pump based water heaters, and it gave me a much better picture of what was worth it and what wasn’t. In the end, even though the graphs told me that the increased efficiency of a gas tankless heater wouldn’t ever pay back the cost difference versus an electric tank water heater, we ended up going with one. The promise of infinite hot water (long showers after a hike!) and no chance of burst water heaters outweighed the additional cost. But at least we were well-informed!

Glowback - Arduino-powered glowing ceramic creature

While I spend most of my time in front of a keyboard and monitor, my wife Eva Funderburgh spends her time sculpting amazing, imaginary ceramic creatures. Her beasts are assembled out of different clays and wood-fired. About a year ago she enlisted my help in building a new type of beast with egg-shaped domes on its back. The idea was to have the domes glow and pulse with an organic, bioluminescent light. (Note: This was way before we’d seen Avatar!) Eva had already built and fired the beast a few months earlier, using thin shells of translucent Southern Ice porcelain for the domes. She left a few of the domes unattached so we could get lights inside after the firing.

The start of the Glowback

We decided to use the open-source Arduino microcontroller platform to drive LEDs inside the domes - that way we could have a bunch of independently-controlled lights and set their behavior with software. We chose the Boarduino Arduino clone from Adafruit Industries because it’s cheap, easy to assemble, and much smaller than the full-size Arduinos. Soldering it together only took an hour or so.

Completed Boarduino

After that we connected a total of 11 superbright LEDs (ordered from DigiKey) to the Boarduino. Since the Boarduino only has 6 PWM pins (which can be used to “fade” LEDs in and out), we put 5 really bright LEDs on their own PWM pins (for the big domes) and wired the remaining LEDs (slightly less blindingly bright ones) in parallel to the 6th pin. The LEDs are unbelievably bright - even after covering them in an anti-static bag they are tough to look at directly.

Franken Beast, glowing

At this point we had to sketch up some software to actually control the lights. Eva wanted a random, organic pulsing, so I started by having each light animate through 360 degrees and used trigonometric functions to create a smooth curve of lighting and fading. We tried a whole bunch of different speeds, patterns, brightnesses, and randomization (some different tests: 1 2 3 4) before settling on the final code. The code is a bit messy because of all the things that got changed around. I ended up using 1 - abs(sin(θ)) as the main brightness function, which gave the lights a sort of “breathing” effect.

1 - abs(sin(θ))

The 0-1 values from that function got converted into a brightness from 0-255 for the PWM output. Actually, the brightnesses were always between a set minimum and maximum brightness, so they never quite go all the way out. Each cycle the speed of the fade gets randomly modified, so the lights never line up in any pattern - it’s pretty hypnotic to stare at.

the belly of the beast.

After this Eva had the unenviable task of stuffing the whole works into the beast. She built little foam stoppers for each LED, and pushed one up into each dome. Then she carefully crammed all the wires inside, and the Boarduino, a switch, and the 9V battery. It ended up being way too cramped, resulting in a lot of broken wires, resoldering, and hot glue burns. Lesson learned - the next glowing beast will be bigger, with more open access to the inside.

The end result is really captivating. Eva ended up displaying it at Gallery Madeira in Tacoma, WA along with some of her other creatures. Since we both put a lot of personal attention the two of us put into the Glowback, and the fact that due to all the hairy wiring inside it’s sort of “high maintenance”, we decided to keep it for ourselves instead of offering it for sale. However, Eva’s not done with the idea of lit beasts containing microcontrollers.

Eva’s has written up a post on the Glowback from her perspective on her own blog - I suggest checking it out to get more detail on the concept and lineage of the piece.

Middle mouse button on a ThinkPad

File this under small victories, I guess. A couple months ago my trusty old ThinkPad R51 decided to cook itself to death, so I went ahead and got a shiny new ThinkPad T500. It’s quite an upgrade, but I missed one feature from my old machine. ThinkPads have this weird hybrid pointing device called a TrackPoint which consists of a trackpad and two buttons, then a nubbin-pointer and three buttons for that. On my old ThinkPad I could use the nubbin’s center button as a middle-click, which is great for opening links in new tabs, closing tabs, Unix-style copy/paste, etc.

t500

I didn’t even use the nubbin, I just used its button. However, on my new ThinkPad, the center button switched the nubbin to scrolling mode, and turning that off in the driver just made the button do nothing! However, I recently stumbled upon the solution. If you completely uninstall the UltraNav driver, the middle button becomes a normal middle mouse button again, and the nubbin and trackpad still work. Tab management is easy again!

Posts I haven't written

, , , , , , ,

I haven’t been updating this blog too much recently. I never meant for this blog to run on a schedule, but I did intend to post more frequently than this. My original idea was that the blog would serve two major purposes. First, it is a place for me to announce new projects or updates to software and websites I’ve already released. It’s done that quite well, though I haven’t had much to announce recently. My job has been taking the majority of my development time, and most of the projects I’ve been working on at home are either private or haven’t been released in the form I’d like to because my employer hasn’t approved them for release yet.

The second major purpose for my blog is as a place for me to record the solution to problems I run across while developing software, so that others won’t have to spend hours Googling or using trial and error to come to the same conclusion. I didn’t intend to rehash things that were easily found or that had already been discussed - only to post when I felt it was something that added value to the internet that hadn’t been there before. So a lot of the blog posts are not really a narrative or running commentary - they’re not meant to be subscribed to, but found individually. It’s for this reason that my most popular posts tend to include the exact text of error messages. This type of post has suffered both because I haven’t been doing as much development, because I can’t discuss a lot of what I’ve learned due to the nature of the projects I’m working on, and because I’ve been learning new stuff (like Ruby on Rails) and haven’t done enough to have solved problems others haven’t already posted solutions for.

The third reason I have this blog is to occasionally talk about my thoughts on different technical topics, from web development to video games. Again, I don’t like to make a post unless I think I’m adding something new, and most of the topics I’ve wanted to talk about have already been covered. I had a lot of draft posts sitting around about web development, web standards, and the evolution of browsers, but then I discovered Alex Russell’s blog and it turns out he’s already said most of what I wanted to say, and better than I could. Other stuff, like my impressions of Windows Vista, critique of stackoverflow.com and suggestions for the Xbox Live Arcade lineup, have been covered to my satisfaction in plenty of places. Maybe some of them will end up posted, but probably not.

Another part of the reason I haven’t posted much is the sheer weight of unfinished posts I have. Right now I have 64 drafts and only 52 real posts! So I’m going to attempt to clear things out by writing a little about what I haven’t posted. A lot of this stuff wasn’t posted because it fell under that third point above, but some of it I was just too lazy to flesh out into real posts. Some of it’s just random stuff. So here’s what’s been happening in the last year:

I got on the bandwagon and picked up iPhone 3Gs for myself and my wife. Everything good you’ve heard about the iPhone is true. Also, almost everything bad you’ve heard about them is true. I really like the device, the UI, and the web browsing, and now that the NDA over the SDK is gone, I might even try to write an app if I get an idea.

I built a new computer in March of ‘07 to replace the machine I had built for college. The new machine is set up as a developer machine primarily, with the additional goal of being as quiet as possible. I can’t say I’m entirely happy with it, since I’ve had some trouble with the hardware and overheating issues mean I have to run the fans above “totally silent” mode. It does its job well enough but I might just buy a Dell next time. The huge CPU heatsink I used is awesome, though.

I’ve been running Windows Vista x64 since my new machine came online. While I think it’s a disappointing release given the 5-year gap between it and Windows XP, I generally like it. It’s certainly better than Windows XP and I wouldn’t go back. I’ve hit some trouble related to using x64, but overall it’s pleasant.

Before that, I was getting pretty sick of the aging Windows XP, so I bought a Mac Mini and ran it, using OS X 10.4, on a second screen next to my XP machine, joined via Synergy. I liked it a lot, but never moved much of my work over there. After getting set up with Windows Vista, the difference between OS X and Windows wasn’t so great, and I unplugged the Mac so I could have both screens for Windows. I moved the Mini up to my TV and used it with Front Row as a media center. Then the Xbox 360 got the ability to play DivX videos, so I stopped using it for that and brought it back downstairs. I was using it for browser testing, but then Apple released a Windows version of Safari. Now it mostly stays off, except when I want to use Handbrake (which won’t work on Vista x64). I still like it, and I really miss having an OS with a real command line, especially now that I’m doing Rails stuff and spelunking through a lot of badly-documented libraries. I’m not sure I’ll ever make the switch though. That said, my trusty old Thinkpad finally died last week, and if I can’t revive it I might look towards the rumored lower-priced MacBooks that should come out soon.

I got two awesome cats named Ozette and Skagit. A lot of my time at home just involves relaxing and petting the cats these days.

After years of using Thunderbird, I switched to GMail as my main mail client so I could use it from the web and use IMAP on my iPhone. I set it up to read all my old POP mailboxes, and I use Google Chrome’s application mode (I used to use Mozilla Prism) to make it look like a standalone app on my desktop. It’s an OK mail reader, especially since I get a lot less email to my personal accounts these days. The main annoyance is spam - I used to use POPFile to filter spam, and it was perfect, with almost no false positives. In contrast, I get maybe 50 pieces of spam leaking through on GMail a week.

Spam has not been limited to my inbox: my support forums are basically nothing but spam and people complaining about stuff I’ve given them for free. It takes a lot of maintenance, and I’m thinking of either trying to transition them to something less attractive to spammers, or just shutting them down entirely.

Back when IE7 was in beta I wrote a handful of bug repro’s for problems I found with it. Recently I’ve been running across all kinds of crazy things in both Firefox and IE, so I’ve been cataloguing them with little examples. Most of them have been fixed with the latest release of each browser, but I figure they’re still useful if anybody’s seeing those problems happen.

I went to Southeast Asia for two and a half weeks. We toured Vietnam, Cambodia and Thailand. It was incredible.

I finally got so sick of CSS that I decided to write a processor that would take an “evolved” CSS syntax that supported named constants, nested selectors, arithmetic, mixins, and such and spit out real CSS. I had it all sketched out and was ready to start implementing when I found SASS, from the same guy who awesome-ified HTML with HAML. SASS is feature-by-feature the exact same thing I wanted to do (except for the whitespace-significant thing, but I can deal). I love it.

I’ve been pretty disillusioned with ASP.NET as a web platform - the web forms are too inflexible and unfriendly to clean markup and unobtrusive JavaScript, and C# feels too rigid and verbose for what I’m doing. LINQ and the other 3.5 features help a lot, but my host is stuck on 2.0. I still haven’t found any templating system that trumps Web Forms, which is why I’m still stuck on Windows hosting for the most part - a lot of my sites are built on ASP.NET for nothing more than the templating. While I’m keeping my eye on ASP.NET MVC, I’m more interested in cross-platform web technologies that give me a bit more choice in hosting.

To that effect, I’ve started a personal project on Ruby on Rails, mostly to learn the platform. So far I’ve really been liking it - having a functional, dynamic language is great, and the structure Rails gives you really helps to quickly get things running. Hopefully I’ll be able to show what I’m making at some point, assuming it works to my satisfaction.

I actually went through a big comparison of different web platforms and different languages, trying to gauge what would be the best for me to develop for. I’m not sure I’ll ever publish my full results, but Ruby on Rails was obviously up there, and Django / Python looked good too.

Speaking of languages, before I discovered jQuery I didn’t really do much JavaScript if I could avoid it. Now I’m writing tons of JavaScript to produce some really nice interactive web apps. I have never been as impressed with a library or platform as I have been with jQuery.

I’ve actually been using Eclipse a lot lately, both for Aptana and for straight Java development, and while it’s slower and buggier than Visual Studio, a free copy of Eclipse plus all the free plugins make it much more compelling than the Visual Studio Express products I use for C# work. Stuff like the outline view, refactoring support, quick fix mode, and real unit testing and source control plugins make all the difference.

I think that’s about all I wanted to get off my chest for now. Hopefully I’ll have a chance to flesh some of that out into full posts sometime, but at least I won’t have so many unwritten drafts staring at me every time I log in to Wordpress.

Website work

I’ve been pretty quiet on the blog lately, partly because I went on a long vacation and partly because I’ve been too busy with real work to do anything much on at-home projects (at least, at-home code projects). Another reason is that I’ve been working on a couple websites that hadn’t launched until recently. The first project was a website for Butterfly Haptics, which is my parents’ new company. They’re producing a really cool magnetic levitation haptic interface - a sort of super-high-tech 3D mouse that lets you feel virtual objects as if they were solid. I’m really excited about what they’re building, and I’ll be at SIGGRAPH this year manning their booth in the New Tech Demos area.

Butterfly Haptics Screenshot

The other site, which just launched, is my wife’s new art site. She makes wood-fired ceramic sculptures of bizarre, cute creatures, and the new site was hand-drawn by her to reflect their style. It’s implemented as a Wordpress theme, which gives her a much easier way to manage the content of the site, and it also means that she can now blog about her process and other art topics. Check out some of the cool time-lapse videos of her sculpting the critters.

evafunderburgh.com Screenshot

Anyway, that’s what I’ve been up to. Hopefully soon I’ll be able to get back to building more cool things and talking about them, as well as clearing out my backlog of draft blog posts.

Setting up IIS7 (with bonus PHP instructions!)

, , ,

Every time I try to set up IIS7 on a Windows Vista machine I run into the same series of problems. You’d think I’d have learned by now, but I usually just struggle through the cryptic error messages and get it working one way or another, then forget about it until the next time I need IIS7 on a machine that doesn’t have it. Finally I’d had enough and so I decided to write myself a little guide here so I won’t waste as much time next time. These instructions are basically the same as these, but with additional detail and screenshots.

The first step is to actually install IIS7. Unlike in Windows XP, IIS isn’t installed by default. That’s great, but it can be kind of hard to find it when I need it.

Add or remove Windows features

You’ve got to click this link that says “Turn Windows features on or off” which will (after some time) bring up a big tree of features you can check or uncheck.

Windows Features - IIS

You’re going to want most of “World Wide Web Services”. If you are also interested in installing PHP, make sure everything I’ve circled in red is checked. I just added everything to be safe. What’s important is that you have the ISAPI and CGI stuff. I also checked the IIS6 compatibility bit so that installers for things like PHP might have a better chance at automatically configuring things (fat chance).

At this point you can start dropping things into C:\inetpub\wwwroot and everything should be peachy. I don’t put my sites there since I have them checked out into various folders in my Documents folder. So I need to create some virtual directories to point to my sites. This probably won’t work off the bat - you’ll get 403 errors that complain about wrong permissions or something. You need to make sure that the “IIS_IUSRS” and “Authenticated Users” users have read access to the directory. I’m not sure why “Authenticated Users” needs to be there but it made it work. Make it look like this:

Setting permissions for IIS7

At this point your folder should be accessible from the virtual directory, and any ASP.NET stuff will probably work. If you’re not interested in installing PHP, you can stop here.

Installing PHP on IIS7

PHP doesn’t really play well with IIS. However, we can get it going good enough for local testing of your PHP code. First, go install PHP5 from php.net. Choose to install it as an ISAPI extension for IIS, but don’t worry too much, since it won’t work anyway. Now open up IIS Manager. If you’ve followed the steps above (specifically, selecting the correct “Windows features”), your IIS manager should look something like this:

IIS Manager with ISAPI and CGI

What’s important is that you have the parts outlined in red - the “CGI” icon, the “ISAPI Filters” icon, and the “ISAPI and CGI Restrictions” icon. Those mean the right bits are installed.

Now double-click the “Handler Mappings” icon, and click “Add Script Map…” Fill out the form like this:

Add PHP script map

Make sure it’s pointing to your real copy of php5isapi.dll. At this point your Handler Mappings screen should look like this:

IIS handler mappings

Also make sure that your “ISAPI Filters” screen looks like this:

ISAPI filters

If not, add PHP like this:

Edit ISAPI filters

If you’re running the 64-bit version of Vista like I am, there’s one last thing to do in IIS Manager. Since the PHP ISAPI extension is a 32-bit app, you’ll need to set your app pool to run in 32-bit mode. I’ve already written one blog post on this (to get MySQL working with ASP.NET), and the instructions are the same. Basically open up the app pool’s advanced settings dialog and flip it to 32-bit mode:

IIS 32-bit app pool

If you forget this you’re likely to get errors that look like “Calling LoadLibraryEx on ISAPI filter "C:\Program Files (x86)\PHP\php5isapi.dll” failed".

If you load up your PHP files you’ll probably get something like “failed opening required” blah blah. This is because the PHPRC environment variable isn’t set correctly by the PHP installer. We’ll have to do it ourselves. Go to the Control Panel and search for “env”:

Environment variable link

Now add a System environment variable like this (point it at the directory PHP is installed):

PHPRC env variable

At this point you must reboot your computer to get the environment variable to take effect. Annoying but true. At this point PHP should work, more or less.

I still have some problems with PHP the way I’ve described configuring it. The most obvious is that the IIS worker crashes every once in a while:

IIS worker crash because of PHP

I suspect reconfiguring PHP to be run as a CGI handler instead of an ISAPI module would help here, but it hasn’t been annoying enough to make me go change it. Another avenue to investigate is the new FastCGI support that’s available for IIS7.

The other problem I’ve had is that I have a handful of image files in one of my sites that are managed by Subversion and get locked and unlocked pretty frequently. After I’ve committed an image, it loses its permissions and can’t be served from IIS anymore, and I need to go reset the permissions. That’s pretty annoying, and I’m not sure if it’s a bug in Subversion or in one of my SVN clients (TortoiseSVN and Subclipse).

At least this setup works enough to try things out quickly. I hope it helps anyone else who’s struggling with one of these setups.

Update: You might want to try out the new Microsoft Web Platform Installer which purports to set up PHP along with anything else you might need.

Better concert experience with ear protection

One of the advantages of living in Seattle is that I get to see great live concerts from my favorite bands. The last week has been a good one for concerts. Last Saturday I got to see The Presidents of the United States of America, who were fantastic, and on Wednesday I saw The Decemberists, who are one of my top 10 favorite bands.

The Presidents of the United States of America playing in the Sky Church

I went to a lot of shows in college, too, and I was even in my own band, which was at the very least loud. After a couple particularly noisy concerts left me feeling uncomfortable about the idea of hearing damage, I (and the rest of my band) picked up some earplugs.

Foam Earplugs

You may have used earplugs like these, foam pellets that block out all noise. These are great for sleeping through construction or operating loud machinery. But using them at a rock concert completely misses the point. Instead, we went to Guitar Center and picked up some earplugs that are designed for musicians.

Hearos Rock n’ Roll Ear Filters

I bring my pair with me to every concert I go to. They don’t just block out sound, they actually make concerts sound better. First, they reduce the volume to a comfortable level, not quiet but not painful either. More importantly, they filter out a lot of the “shimmery” noise you get in a big crowd - the random static of the crowd yelling, the echoes of the room, and the highest part of distorted guitars. Once you’ve gotten those out of the way, lyrics become understandable, individual instruments pop out of the noise, and bass becomes richer, without as much rattle. It’s really a better way to listen to concerts. And of course you’re protecting your ears from permanent damage. They are definitely a win all around.